yolov3 widerface dataset으로 학습시키기
yolo v3
Preparations
widerface benchmark dataset download
http://shuoyang1213.me/WIDERFACE/
widerface benchmark dataset을 darknet dataset format으로 바꾸기
the-house-of-black-and-white/morghulis
학습 환경 준비
pip install -U -r requirements.txt해당 깃허브에 Wiki에 들어가면 쉽게 시작할 수 있는 tutorial이 있다.
나는 coco가 아닌 wider dataset으로 학습을 돌려야하기 때문에 “Train Custom Data”에 있는대로 따라함 !!
Custom dataset
path —> “…/yolov3/data/”
“customdataset.data”, “customdata.names”, “train.txt”, “valid.txt” 파일에 등록 !
일단 yolo v3를 돌리기 위한 dataset의 ground truth format은 class x_center y_center width height 이다. (각 값은 0-1 사이로 정규화되어있음)
그리고 각 train dataset과 validation dataset에 대해 image directory와 label directory가 존재해야한다.
-
customdata.names
class의 이름들을 설정하는 파일이다.
class의 개수와 행의 개수가 같도록 파일을 작성하면 된다.\
widerface는 detect할 object가 face 하나 뿐이므로 “face”라고 한 줄만 적어주면 끝 !
-
customdata.data
class의 수, train/validation dataset label의 파일 경로, class 파일의 경로를 명시해준 파일이다
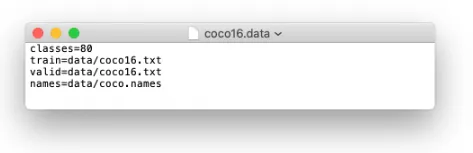
data/
	customdata.names
	customdata.data
  customdata_train.txt
  customdata_valid.txt
위와 같은 파일 구조를 기준으로 customdata.data 파일에는 아래와 같이 적혀있으면 된다.\
classes=1
train=./data/customdata_train.txt
valid=./data/customdata_valid.txt
names=./data/custimdata.names
train/valid txt 파일에는 각 이미지의 경로가 한 줄에 하나씩 존재하면 된다 !
Training
Inference
python3 test.py --data ./data/customdata.data --weights ./weights/best.pt --cfg ./cfg/yolov3-1cls.cfg --batch 4 --save--json - cfg 및 batch는 학습했을 때 설정한 hyperparameter 값으로 설정하면 될듯 함 !
Issue
- inference할 때
python3 test.py --data ./data/customdata.data --weights ./weights/best.pt --cfg ./cfg/yolov3-1cls.cfg --batch 4 --save--json output
Namespace(augment=False, batch_size=4, cfg='./cfg/yolov3-1cls.cfg', conf_thres=0.001, data='./data/wider.data',
					device='', img_size=512, iou_thres=0.6, save_json=True, single_cls=False, task='test', weights='./weights/best.pt')
Using CUDA device0 _CudaDeviceProperties(name='Tesla V100-DGXS-32GB', total_memory=32478MB)

Model Summary: 222 layers, 6.15237e+07 parameters, 6.15237e+07 gradients
Fusing layers...
Model Summary: 150 layers, 6.14974e+07 parameters, 6.14974e+07 gradients
Caching labels /workspace/daehee/jh/detectron2/data/WIDER_val/labels/30--Surgeons.npy (3222 found, 0 missing, 0 empty, 1 duplicate, f
               Class    Images   Targets         P         R   mAP@0.5        F1: 100%|████████████| 806/806 [01:32<00:00,  8.72it/s]
                 all  3.22e+03  3.91e+04     0.895     0.606      0.68     0.723
Speed: 7.1/2.3/9.3 ms inference/NMS/total per 512x512 image at batch-size 4

COCO mAP with pycocotools...
WARNING: pycocotools must be installed with numpy==1.17 to run correctly. See https://github.com/cocodataset/cocoapi/issues/356
requirement.txt에 있는 설정대로 설치해서 numpy 1.17로 깔려있는데 계속 이 오류 때문에 cocoeval 출력이 안나옴..ㅠㅠㅠ
warning 메세지 띄운 코드 찾아가려고 test.py 파일을 열어보니까
# Save JSON
    if save_json and map and len(jdict):
        print('\nCOCO mAP with pycocotools...')
        imgIds = [int(Path(x).stem.split('_')[-1]) for x in dataloader.dataset.img_files]
        with open('results.json', 'w') as file:
            json.dump(jdict, file)

        try:
            from pycocotools.coco import COCO
            from pycocotools.cocoeval import COCOeval

            # https://github.com/cocodataset/cocoapi/blob/master/PythonAPI/pycocoEvalDemo.ipynb
            cocoGt = COCO(glob.glob('../coco/annotations/instances_val*.json')[0])  # initialize COCO ground truth api
            cocoDt = cocoGt.loadRes('results.json')  # initialize COCO pred api

            cocoEval = COCOeval(cocoGt, cocoDt, 'bbox')
            cocoEval.params.imgIds = imgIds  # [:32]  # only evaluate these images
            cocoEval.evaluate()
            cocoEval.accumulate()
            cocoEval.summarize()
            # mf1, map = cocoEval.stats[:2]  # update to pycocotools results (mAP@0.5:0.95, mAP@0.5)
        except:
            print('WARNING: pycocotools must be installed with numpy==1.17 to run correctly. '
                  'See https://github.com/cocodataset/cocoapi/issues/356')
해당 코드에서 처리한 경고 문구였다
정확한 에러메세지가 뭔지 확인하기 위해서 try~except 구문을 없애고 다시 실행했더니
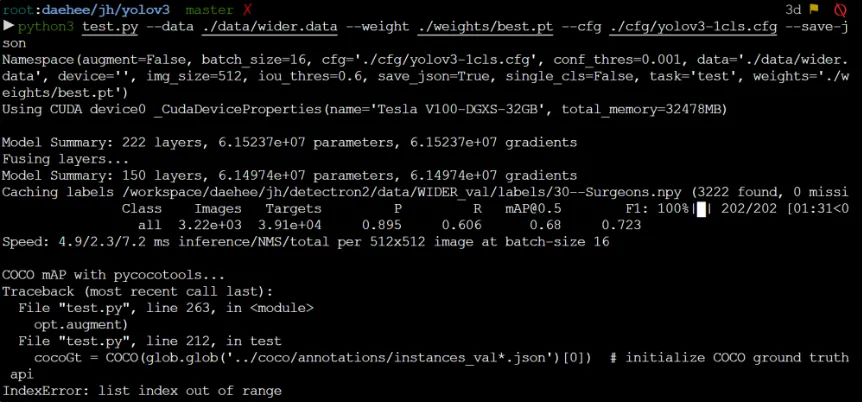
coco annotation 경로 문제였던 것.. 내가 설정을 안해줬구나….
그리고 … image id 설정 다시하세요… !